Docker is a popular platform for building, running, and managing containers. When you need to run containers across multiple machines, Docker Swarm acts as a built-in tool for clustering and orchestration. A Swarm is made up of nodes with some managing the cluster and others running container tasks. Manager nodes can do both and worker nodes can only execute tasks assigned by the manager nodes. Swarm handles networking automatically, so containers across different machines can communicate without extra setup as long as your firewall or network isn’t blocking the required ports. If you have four nodes that each have enough resources to run 100 containers, your cluster can support up to 400 containers in total. If you deploy more than that, the extras stay pending until more resources are available. Swarm spreads out tasks, reschedules them if something fails, balances traffic, and supports rolling updates.
For this lab I will be running 3 Linux Mint virtual machines using VMWare. You can use whatever environment you want but if you don’t have docker make sure you install it or you wont be able to continue forward. Use this link and copy the first two code blocks from a guide I made earlier: https://nodetechsystems.ca/introduction-to-docker-the-essentials/
To start a Docker swarm, use the docker swarm init command. Replace the <ip> with your own actual ip. You can grab your ip address using:
ifconfigAfter that copy and paste or type your ip address and use the docker swarm init command.
docker swarm init --advertise-addr 192.168.200.128
It will give you a command to add workers to this swarm. I would copy and paste that into notepad so you do not lose this command. Go to your other machines and paste in your command. Don’t paste in my command because yours should be unique but this is what I will be putting into the other machines.
docker swarm join --token SWMTKN-1-141uvipfih1lt9k80rv0quhid2i40jw3txajpyx2e3i5zpmvvh-drswjv0m0g6dyv8c4sscutaww 192.168.200.128:2377

What we just did is on computer 1 we used docker swarm init to make a swarm and make that current computer a manager node. We then used docker swarm join to join two other computers to the swarm as workers.
Run docker info to check the current state of the swarm. It will tell you if the swarm is active and some other useful information.
docker info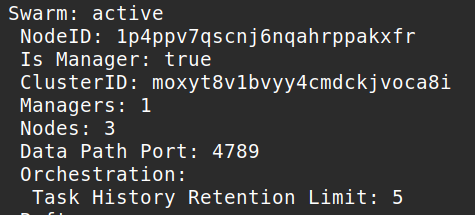
Run this command for a more detailed look at the nodes. This command will only work on manager nodes. It will fail if you try to run it on a worker node.
docker node ls
You can see the computer we ran docker swarm init on is the leader while the other 2 computers are workers. We can tell its workers cause the manager status section is empty for those 2 computers. Let’s try to promote and demote nodes. Run this command to promote worker nodes to manager nodes. Replace my ID nodes with your ID nodes or you can use their hostnames instead of the ID.
docker node promote q2jpnra9axy8x28gsn8e6hmm5 jyo0zbcc33d66907jcwxq4b1lLet’s demote these same nodes back to worker.
docker node demote q2jpnra9axy8x28gsn8e6hmm5 jyo0zbcc33d66907jcwxq4b1lAlternatively, you could use their hostname instead of specifying their ID. Use whichever you want.
docker node demote user2-virtual-machine user3-virtual-machine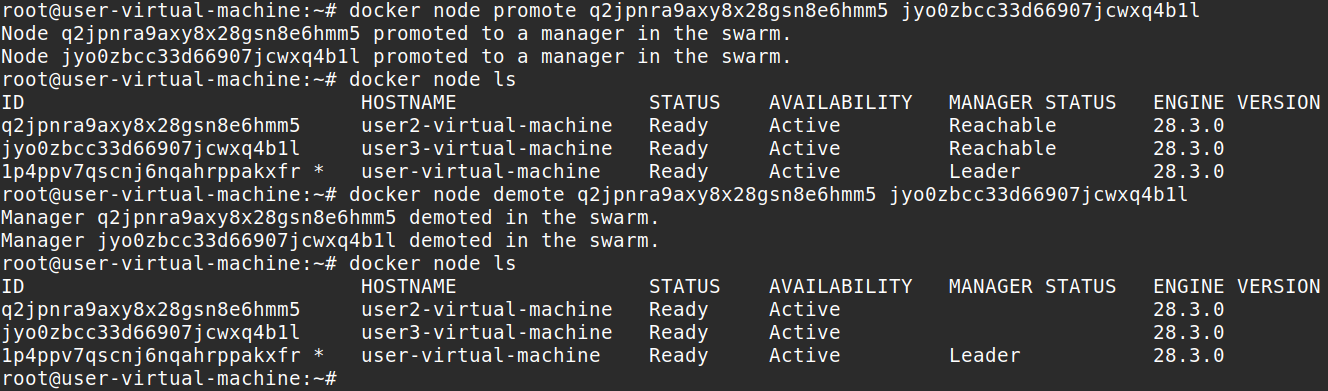
Reachable manager status means if the leader goes down the other two computers that are reachable are eligible for election as the new leader of the swarm. Let’s test this, so go back and promote the two computers again and let’s shut down the Leader of the swarm.

User2-vm was promoted to Leader and now User-vm is labeled as unreachable because I turned it off. When I turn the User-vm back on lets see what happens.

The user2-vm remains the leader. User-vm is now reachable but is no longer the leader. I will demote two nodes and continue, after demoting the two nodes let’s deploy a service on our manager node. You should always do docker service on manager nodes.
docker service create --replicas 1 --name test busybox ping google.comThis creates a service called test with the –name flag. It uses –replicas to specify the desired state to 1 running instance, it runs 1 replica (container) of the service. I am using busybox as the image and I am pinging google.com. Use the following command to view a list of running services.
docker service ls
Run docker service inspect –pretty <SERVICE-ID> to display the details about a specific service. The –pretty makes it so it is easily readable. Without the –pretty flag would give you details about the service in a JSON format.
docker service inspect --pretty test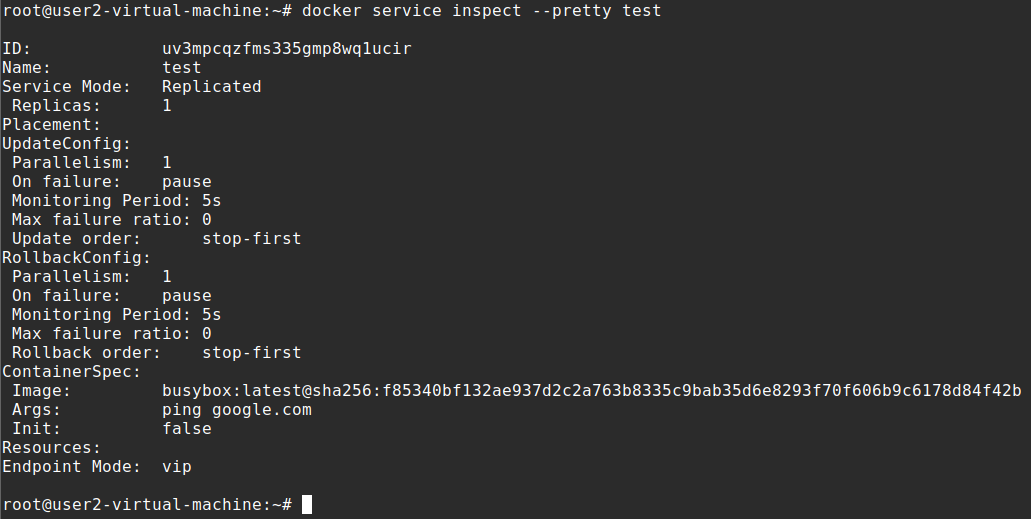
An alternative command that’s the same but puts it into JSON format.
docker service inspect testRun docker service ps <SERVICE-ID> to see which nodes are running the service.
docker service ps testIf you would like to see the actual container information where the service is running you would go on the node and do docker ps.
docker ps
You can see here the container ID, the image it uses, the command that was specified in the service create from earlier, when it was created, the status and ports. Notice I created the service on user2-virtual-machine earlier but because I specified –replicas as 1 it picked user-virtual-machine as the node to run the container.
Let’s scale the service we made earlier. We can use docker service scale <SERVICE-ID>=<NUMBER-OF-TASKS> to change the desired state of the service running in the swarm
docker service scale test=5Run docker service ps <SERVICE-ID> to see the new tasks
docker service ps test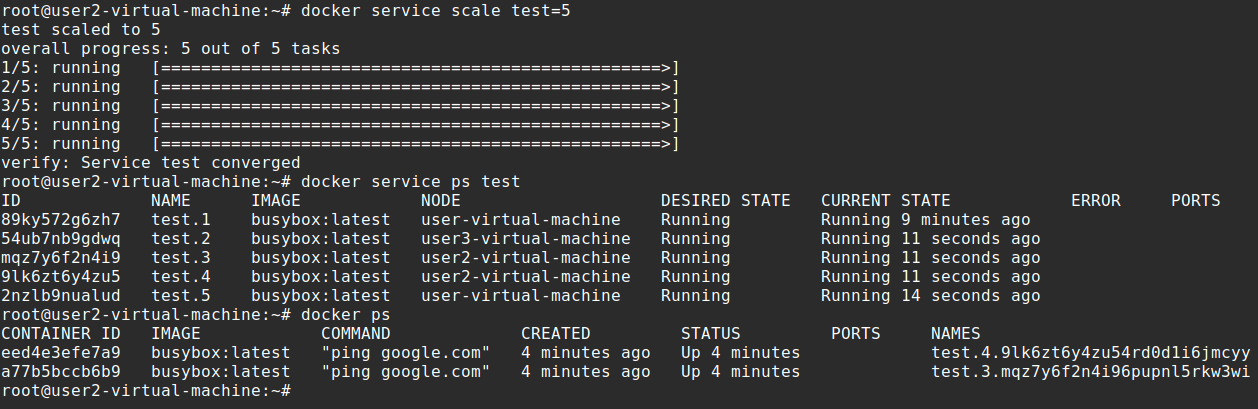
What happened here is we specified earlier a replica of 1. We wanted 1 task somewhere in the cluster but now we scaled it to 5. I will go to the other 2 nodes and show you what it did.


We created a service with a replica of 1 but scaled it to 5 later. It put 2 of those tasks on user2, another 2 on user and 1 on user3. Docker swarm automatically balanced the service replicas out across the nodes for us.
Docker swarm can also issue updates to a service using docker service update. Let’s update our service to change something about it.
docker service update --image alpine test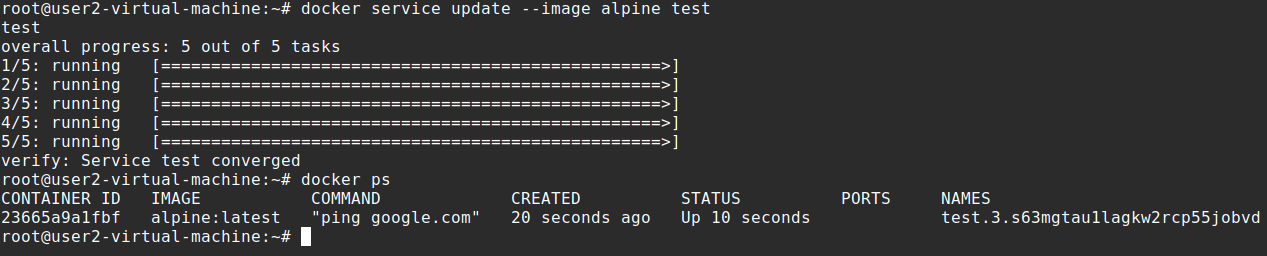


Here we are changing the image to alpine for the test service we made earlier. You can see it changed the image for all the containers. Lets drain a node now. All nodes have been running with Active availability. Sometimes for maintenance you must set a node to Drain availability, drain availability prevents a node from receiving new tasks from the swarm manager. It also stops tasks running on the node and launches tasks on a node with an active availability because the drain node is no longer suitable for tasks. You should have 3 nodes active and running. Check it with docker node ls, after that you should have a running service on these 3 nodes, we can also check it with docker service ps test.
docker node ls
docker service ps test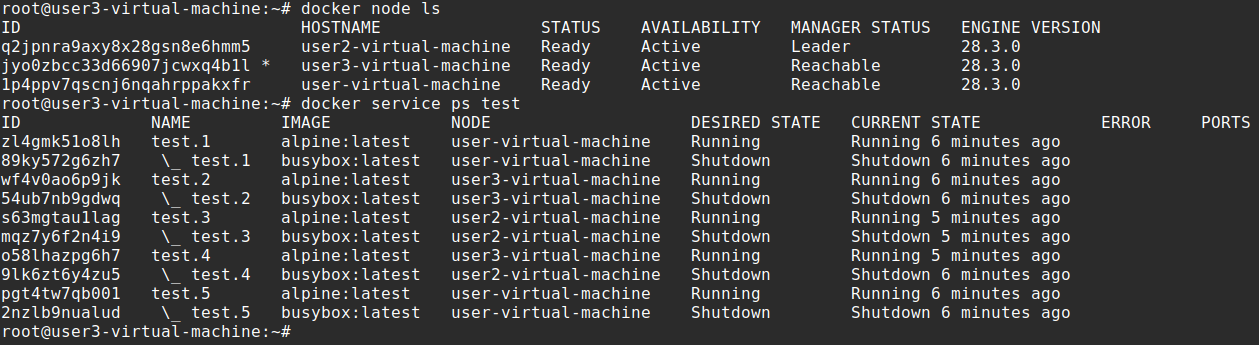
Now lets drain a node.
docker node update --availability drain user3-virtual-machineCheck the node for its availability
docker node inspect --pretty user3-virtual-machine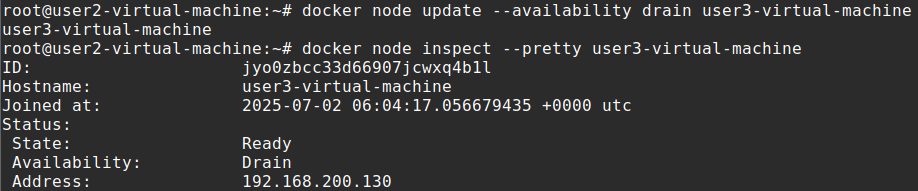
 Go to the node that you drained and run docker ps -a, you should see everything shut down. The two containers that were just running got shut down due to the drain availability. This may take some time.
docker ps -a
You can turn back the availability to Active with this command
docker node update --availability active user3-virtual-machineTo delete a service running on the swarm issue this command: docker service rm <SERVICE-ID>
docker service rm testYou can inspect the service now and it should give back an error because it doesn’t exist anymore
docker service inspect test
When you issue docker ps to see the task containers they will still be there because it takes some time to clean everything up after the service is deleted. Give it some time to clean up then put in the command docker ps and it should be all cleaned up. Swarm automatically cleans up containers which is a nice feature.
To remove a node from the swarm, go to the manager and enter the docker node rm command. You can force it as well if you want however this way is not preferred because it is cleaner to leave from the node. You cant kick out cluster managers so make sure they are demoted to workers first.
docker node rm --force user3-virtual-machine
Alternatively, you can just connect into the node and leave from the node as well. This is the cleaner way to do it because leaving will clean up things compared to if it just gets kicked out by a manager. After issuing the docker swarm leave command you should still do the above docker node rm command on the manager to ensure the entry is removed on the manager’s side. Connect to the node and leave with this command:
docker swarm leaveThe above command wont work if you are leaving as a manager from the swarm so you can use the –force
docker swarm leave --force
This is the basics you should know for docker swarm. We made a swarm, promoted/demoted nodes, deployed a service, scaled the service, applied an update to the service, and then deleted the service. Swarm has even more features that we have not configured here like routing mesh and load balancing. There are also limitations with docker swarm like having a limited ecosystem and having no built in autoscaling like Kubernetes has. But docker swarm is still solid for availability and resilience which is why it’s still good to know.